Fast transitions
At worst fast transitions can shave minutes of your total race time. At best they can be the difference between winning and losing.
Fast transitions are a combination of developing skills, practising those skills and thorough preparation – both in advance and on race day itself.
T1 – Swim to Bike
Developing key skills
- Removing wetsuit. Practise undoing the fastening. After swimming in your wetsuit, always remove it as though racing – you don’t get many opportunities
- Stepping out of the wetsuit without using your hands. Practise using cycling or running tights
- Putting your helmet on. Practise doing the buckle up. Use your fingers to guide the two parts together.
- Putting on your Number belt. Practise stepping in. Better to step in than fiddle with the buckle.
- Running with your bike. Learn to push it holding the saddle only. Practise running like this.
- Mounting. Practise mounting (more below)
Advance Preparation
- Equipment – Towel, talcum powder, tape, elastic bands, scissors, safety pins, vaseline, baby oil, pump, inner tube, tyre levers, cycle lube, screwdriver, allen keys.
- Food - Energy gels? Power bars? Real food! Drink bottles. How are these to be carried?
- Helmet and glasses – What’s the sequence for putting these on? How will they be positioned in transition?
- Extra clothing – Have you practised putting a T-shirt or jacket on wet skin? With a number pinned on?
- Number belt – how will you fix the number to it
Race Specific Preparation
- Walk through the course. Learn the best route. Look for hazards, markers etc. Be vary wary of using temporary things as markers
- Will the transition look the same when you arrive? (full/empty)
- Decide where to take your wetsuit off. If there is a long run to transition consider taking it off early while it is still full of water
- Know the mount line
- Decide where to put your feet into your shoes
- Select the correct gear before racking your bike
- How is this transition different from your ‘normal’? (Long run in, long run out, steep hill out, rough ground, boggy ground)
Tips
- Don’t remove your goggles or swim hat until you reach your bike – you need both hands free for undoing your wetsuit. Lift the goggles to your forehead. If the organisers want to collect hats put their hat over your goggle straps and wear your own hat underneath.
- Wetsuits come off more easily if they are full of water. Hold the neck down just before you get out of the water to get some water inside.
- If you have trouble getting your wetsuit off over your feet consider cutting a little off the end of the legs to make the holes larger.
- Watch other people – especially the pros. Video triathlon whenever it is on the TV.
- If you are racking your bike overnight put it in a large polythene bag or cover to keep it dry. Take some tape to keep the polythene in place. When you arrive in the morning bring lubricant, a cloth or towel to dry your bike, your pump (ideally a track pump), a spare inner tube and your tyre levers.
T2 : Bike to run.
Developing Skills:
- Practise preparing for transition on the bike – Gearing. Stretching. Taking your feet out of your shoes (learn to do this without looking down)
- Learn to dismount quickly – more below
- Practise removing helmet
- Practise putting on running shoes
- Practise running off the bike
Advance Preparation
- Toggles or elastic laces
- Talcum powder
- Anything to take on the run? Food, drink, number belt, hat
- Towel
- Sequence – helmet off or shoes on first?
- Will you be removing any clothes – jacket? cycling jersey?
Race Specific Preparation
- Where is your spot? Walk through. What will the transition area look like when you arrive on your bike?
- Where is the dismount line?
- How must you rack your bike?
- Is it going to rain? Should you put your shoes upside down or in a bag?
- Where should you take your feet out of your cycling shoes?
Tips
- In very cold conditions a shoehorn can make getting shoes on with numb fingers much easier.
- In long distance races carrying antiseptic wipes and plasters could be the difference between running and walking to the finish
Mounting and dismounting quickly
The quickest way of mounting is a cyclo-cross style running jump straight onto the saddle. The best way to practise this is in running shoes, starting slowly and then building up speed.
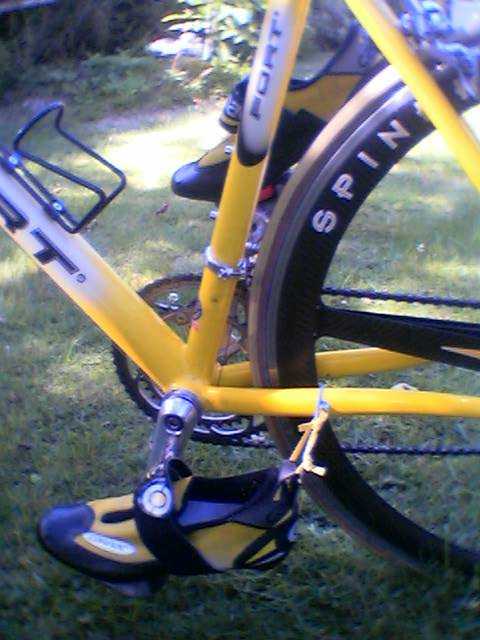
An alternative method that we derived for Heather can only done with elastic bands and involves holding the shoes horizontal with the cranks vertical. You can then place one foot on top of the shoe on the lower pedal and scoot to mount

The quickest way to dismount is to lift one leg over the back of the saddle while still on the move and coast to the dismount standing on the opposite pedal. To reduce the risk of stumbling bring the free leg between the other one and the bike before stepping onto the ground. (If you try this with your feet still in your shoes, and your shoes clipped to your pedals, you are likely to end up with cuts and grazes)
Shoes
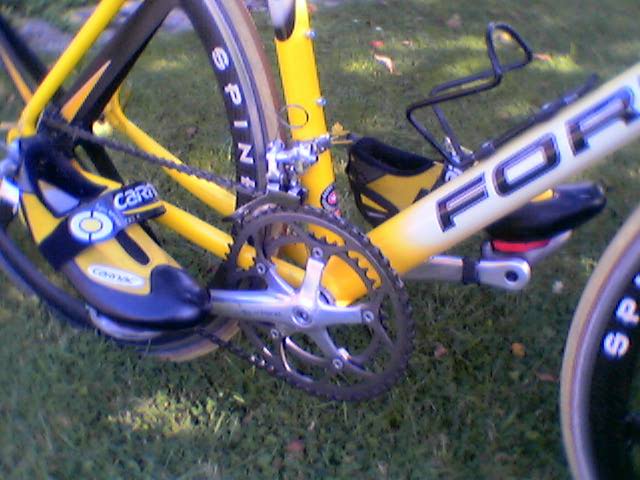
Every professional triathlete racks racks his bike with his shoes clipped to the pedals and puts his feet into them after mounting.
If you put your shoes on while standing still in the transition area you travel zero distance towards the finish line in the time that it takes to put them on. If you put your shoes on while moving you are at least killing two birds with one stone. It obviously also makes some sense to put them on at speed. I.e. accelerate away from transition and build up speed before putting your feet in instead of wobbling along very slowly trying to get them in before turning the pedals.
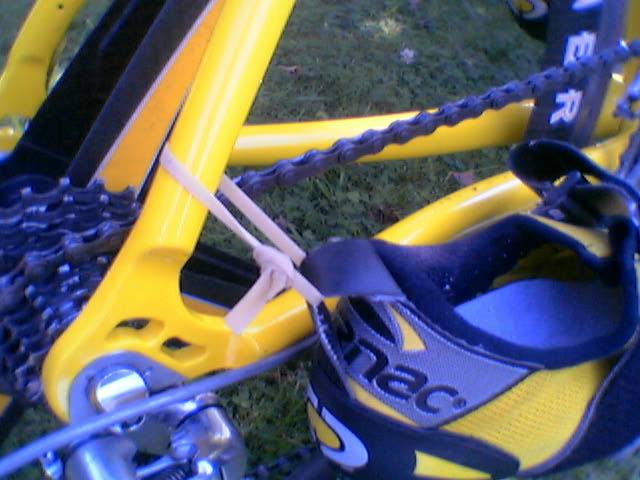
There are some drawbacks with having your shoes clipped to the pedals. The most serious is that unless the pedals stay horizontal one of your shoes will hit the ground. This can result in the shoe coming off. The solution is to use elastic (cut an elastic band) to tie the shoes into a horizontal position. Most triathlon shoes have a finger loop at the heel which makes tying them to the frame easy. If the elastic doesn’t snap when you start pedalling it doesn’t matter – you can easily reach down and snap it by hand. (I've read pieces which suggest tying the elastic to one of the gear mechanisms or a quick release lever. This seems a bit silly to me as a sharp pull on one of those could have very undesirable consequences)


Another drawback is the potential for the straps to get tangled. The pictures above show how to prevent this by 'doing the straps up losely'. You could also put a safety pin though the end of the strap if there is any chance that it might slip through the buckle.
Practise taking your feet in and out of your shoes while riding.
Remember…
An Amateur practises something until he gets it right, a Professional practises until he can’t get it wrong.
